Compile and Run Java Applications from the Command Line – Step-by-Step


In this article, we will learn how to compile and run Java applications from the command line. While applications are usually developed and launched through IDEs like IntelliJ IDEA, understanding the process via the command line can help you better understand how Java applications work.
1. Syntax for Compiling and Running from the Command Line
Before running a Java application, you need to compile it. Use the javac command for compilation.
Syntax for javac:
javac [options] [source-files]For example, to compile the MyFirstApp program from the previous lesson, How to Write Your First Java Application, run the following command:
javac MyFirstApp.javaInitially, try compiling without options, then explore available options later. The compilation process generates a .class file for each class in the source file.
After compilation, the application can be launched using the java command.
Syntax for java:
java [options] class [arguments]Example:
java MyFirstAppThis command will display:
"Hello world!!!"2. Compiling and Running Applications with Multiple Files
Let’s examine a program with multiple files:
public class MyFirstApp {
   public static void main(String[] args) {
       Helper.print();
   }
}
public class Helper {
   public static void print() {
       System.out.print("Hello world!!!");
   }
}
When compiling MyFirstApp.java, the compiler detects the Helper file and compiles it as well. Run the application as follows:
java MyFirstAppNote: Only the main class name (without the .class extension) is specified during execution.
3. Compilation Using the -d Option
By default, the compiler saves the .class files in the same directory as the .java files. For larger projects, it is preferable to separate source files and compiled files into different directories.
The -d option specifies the output directory for the generated .class files.
Example directory structure:
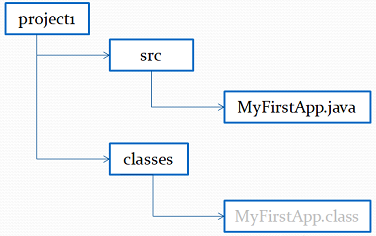
Run the following commands from the project1 directory to compile and place the MyFirstApp.class file into the classes directory:
cd project1
javac -d classes src/MyFirstApp.java
When using packages, the -d option organizes output files according to the package structure:
Example structure:
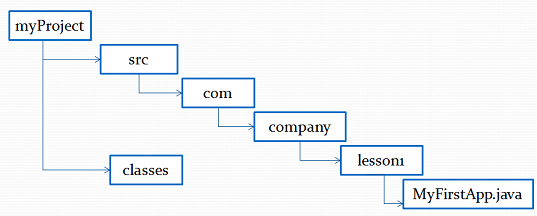
cd myProject/src
javac -d ../classes com/company/lesson1/MyFirstApp.java
Ensure the classes directory exists; otherwise, you may encounter a compilation error.
4. Launching Applications with Java Launcher
Starting from Java 11, you can compile and run a single-file program using a single java command:
java MyFirstApp.javaJava 22 extends this feature to support multi-file programs:
- For learning purposes – simplifies running initial programs.
- For quick experiments without project creation.
- For prototyping small applications.
Please log in or register to have a possibility to add comment.