
Creating a Local Git Repository in IntelliJ IDEA
A local Git repository is a hidden .git folder inside your project where Git stores the history of your changes: snapshots of files, authors and commit messages. It is created by the git init command and works entirely on your machine, with no internet connection. GitHub comes in at the next step — when you want to send that history to the cloud and share the project.
Where these menu items live in current IntelliJ IDEA
The screenshots in this lesson show the current IntelliJ IDEA interface. If you are on a version older than 2020.1, or you ran into older menu names in another guide, here is how the paths map to today's:
| Action | Old path (before 2020.1) | Current path | Shortcut |
|---|---|---|---|
| Create a local repository | VCS → Import into Version Control → Create Git Repository | VCS → Enable Version Control Integration… → Git | — |
| Open the changes view | View → Tool Windows → Version Control | Commit tool window (changes) and Git tool window (history) | Alt+0 / Alt+9 |
| Add a file to version control | Context menu → Add to VCS | Context menu → Git → Add | Ctrl+Alt+A |
| Commit | VCS → Commit Changes | Git → Commit… | Ctrl+K |
| Publish the project on GitHub | VCS → Import into Version Control → Share Project on GitHub | Git → GitHub → Share Project on GitHub | — |
| Send commits (push) | VCS → Git → Push | Git → Push… | Ctrl+Shift+K |
| Fetch and merge changes (pull) | VCS → Git → Pull | Git → Pull… | — |
Step 1. Create the local repository
Open your project in IntelliJ IDEA. To initialize a local Git repository, go to VCS → Enable Version Control Integration… (in versions before 2020.1 this item was called VCS → Import into Version Control → Create Git Repository).
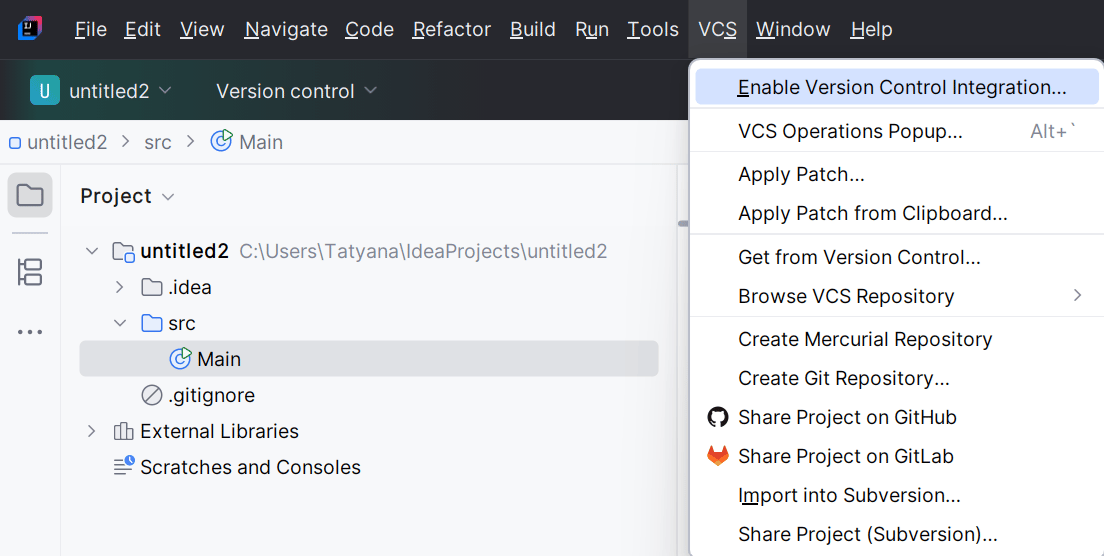
Then pick Git from the drop-down list:
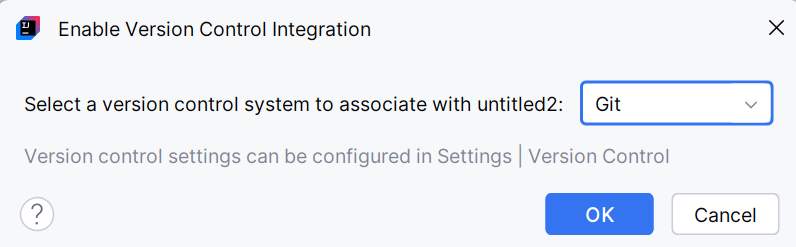
After you click OK, a notification reading «Created Git repository in <PROJECT_DIRECTORY_PATH>» appears next to the Git icon at the bottom:
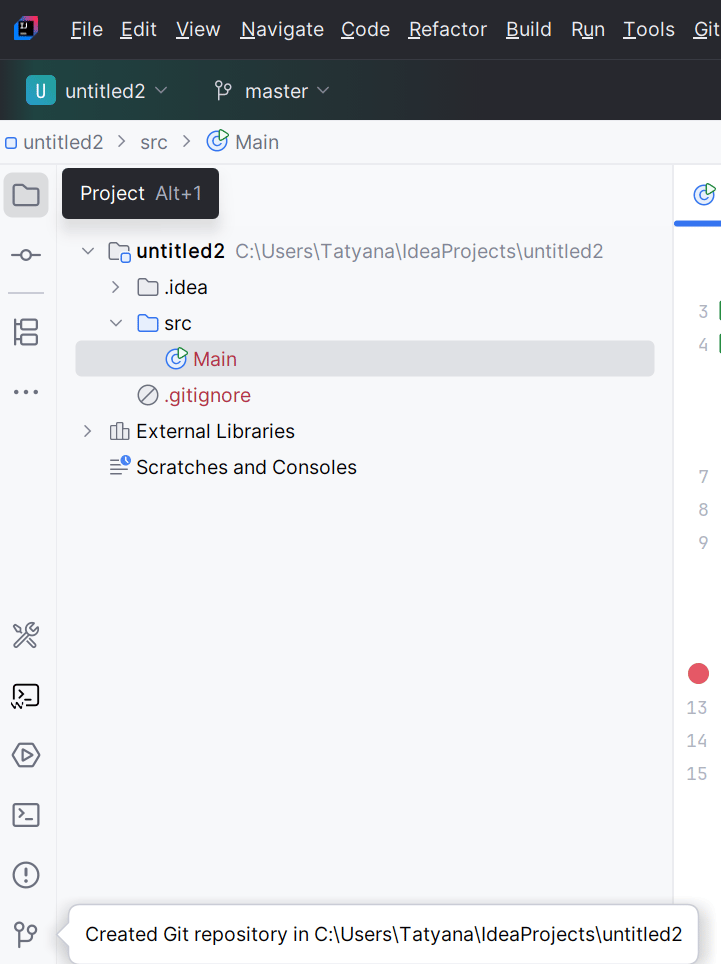
Once the repository is created, two tool windows appear at the bottom: Commit and Git. If they do not, open them via View → Tool Windows → Commit (Alt+0) and View → Tool Windows → Git (Alt+9). In versions before 2020.1 these were a single Version Control window.
Step 2. Put files under version control
Creating a repository does not track anything by itself: Git does not know yet which files it should watch. In the Commit window, the tab you need is Changes. The Unversioned Files list holds everything Git does not track; IntelliJ IDEA shows those files in brown:
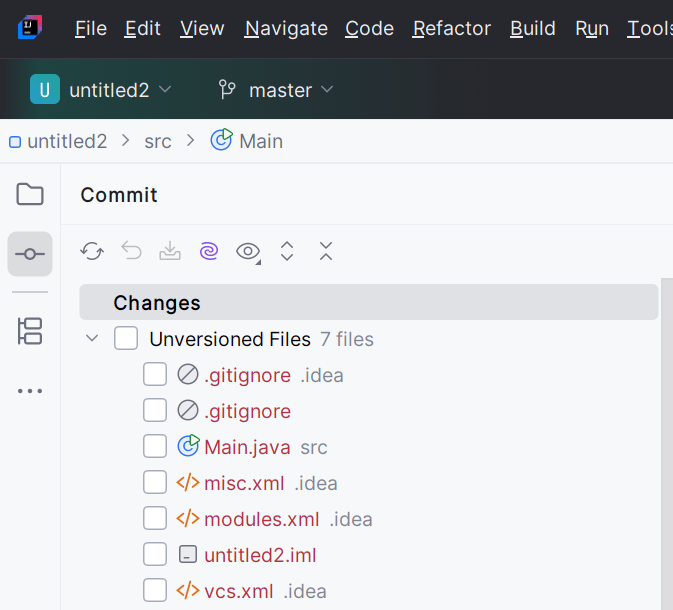
Select the files whose changes you want to track, open the context menu and choose Git → Add (in versions before 2020.1 this item was called Add to VCS):
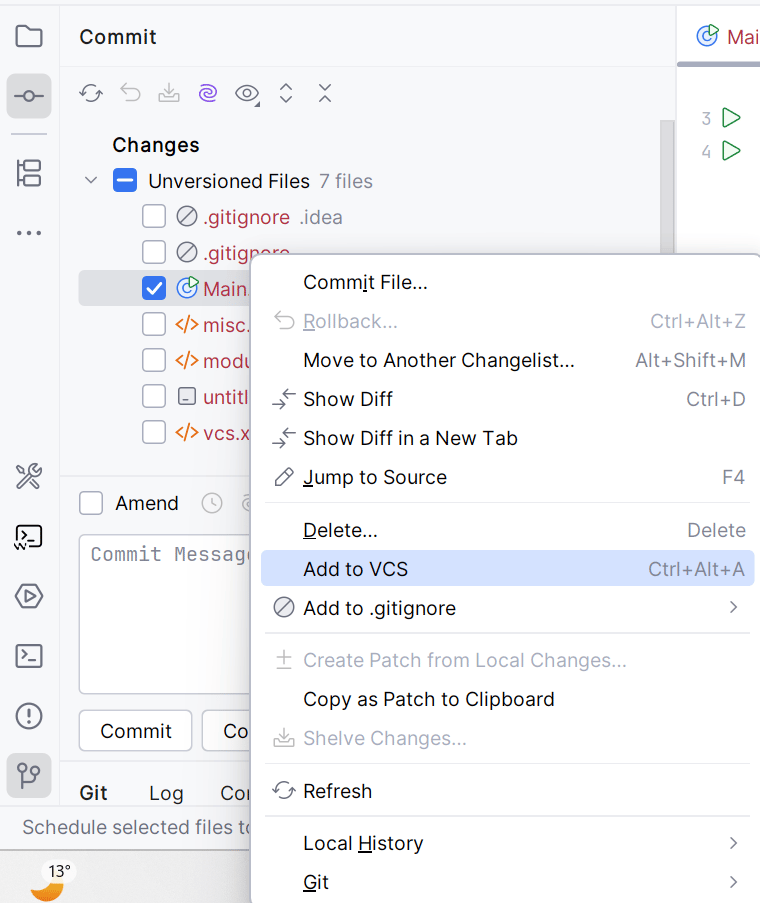
As a rule, a repository holds source code (.java, .xml) and build configuration files (pom.xml, build.gradle). Compiled and temporary artifacts — .class files and the target, out, build folders — do not belong in commits; it is easier to list them once in .gitignore.
Write .gitignore before the first commit
A .gitignore file in the project root saves you from picking files by hand: Git simply stops offering the noise. A minimal set for a Java project is target/, out/, build/, *.class, .idea/, *.iml. If a file is already tracked, adding a line to .gitignore will not remove it — you have to run git rm --cached first.
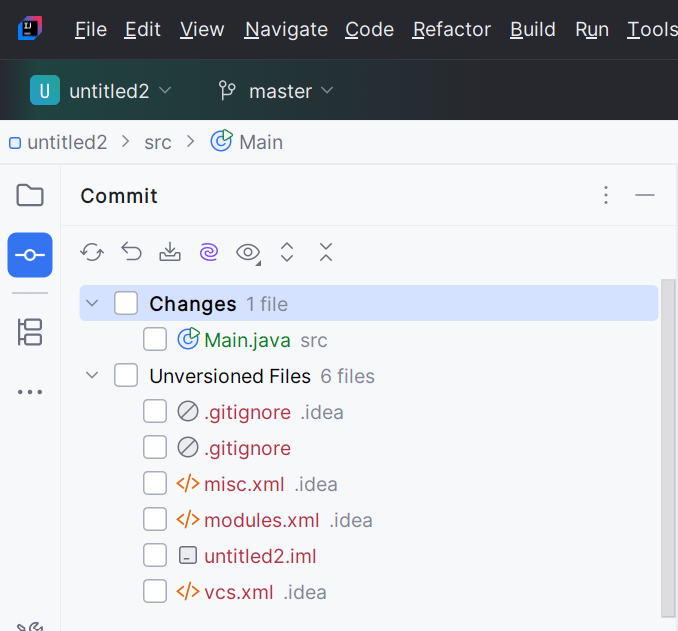
After you add it, Main.java moves to the Changes list — the list of tracked files that will go into the repository with the next commit. Files you have just added are shown in green:
When the project is already under version control, IntelliJ IDEA offers to add every new file to Git for you:
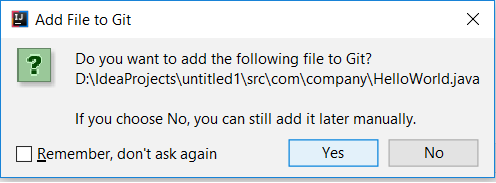
Click Yes to accept.
Step 3. Commit
A commit records the state of the project in the repository: Git takes a snapshot of all files from Changes as they look right now. In Changes, select the files to commit and fill in the Commit message field — a short description of what this commit changes:
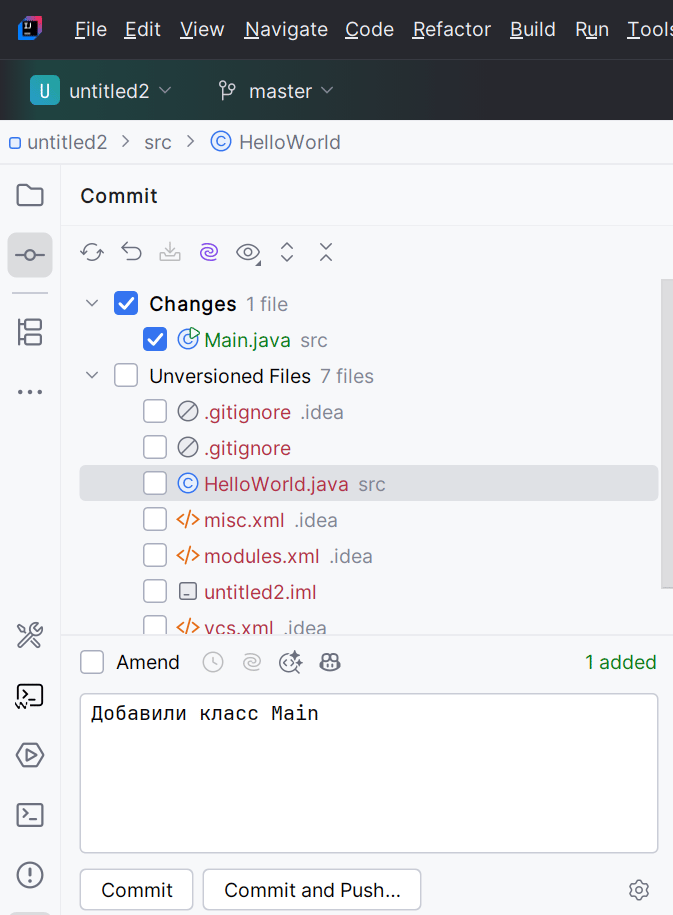
If you edit a file that has already been committed, it shows up in Changes again, this time highlighted in blue: for Git it is no longer a new file but a modified one.
To browse all commits, switch to the Log tab. It shows who made each commit and when, which files changed and with what message:

Commit and Commit and Push are different buttons
A plain Commit stores the snapshot in your local repository only — GitHub still knows nothing about it. The arrow next to the button opens Commit and Push…, which sends the commit to the remote repository right away. Handy, but keep in mind: once a commit is pushed, other people can already see it, and rewriting that history is no longer free.
Step 4. Share the project on GitHub
So far everything has happened on your own machine. To put the project online, go to Git → GitHub → Share Project on GitHub (in versions before 2020.1 — VCS → Import into Version Control → Share Project on GitHub):
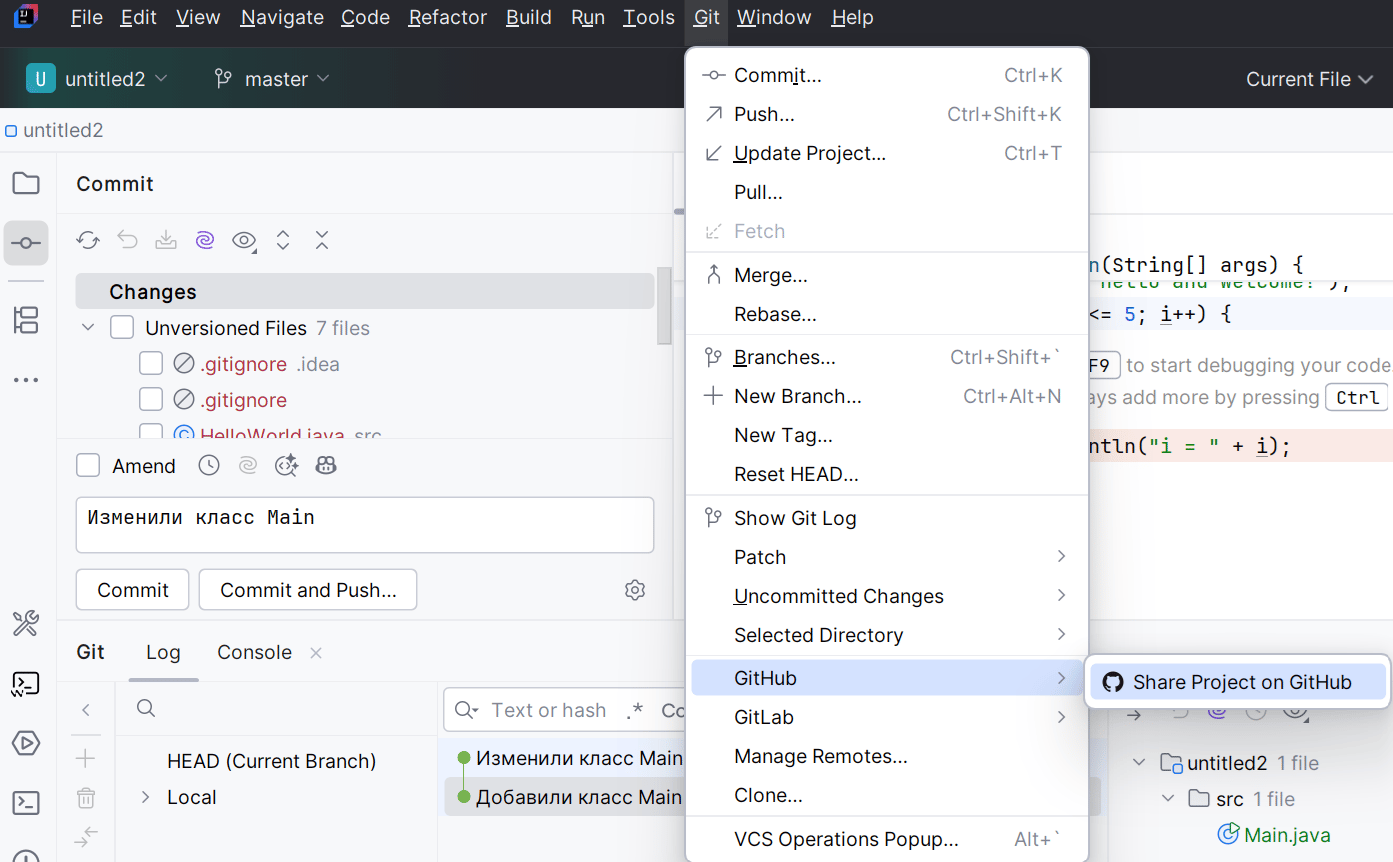
A dialog asks for the repository name and its visibility, public or private. After you confirm, IntelliJ IDEA creates the repository on GitHub, registers it as the origin remote and performs the first push. The default branch on GitHub is called main or master — that is the name you will see in the repository URL.
Before sharing, make sure your GitHub account is connected to the IDE: Connecting a GitHub Account to IntelliJ IDEA.
Your GitHub password no longer works
Since 13 August 2021 GitHub does not accept an account password for Git operations over HTTPS. The IDE settings offer two working options: Log In with GitHub (browser-based OAuth sign-in) or Log In with Token — a personal access token created on GitHub under Settings → Developer settings → Personal access tokens. For private repositories the token needs at least the repo scope.
Steps 5 and 6. Push and pull
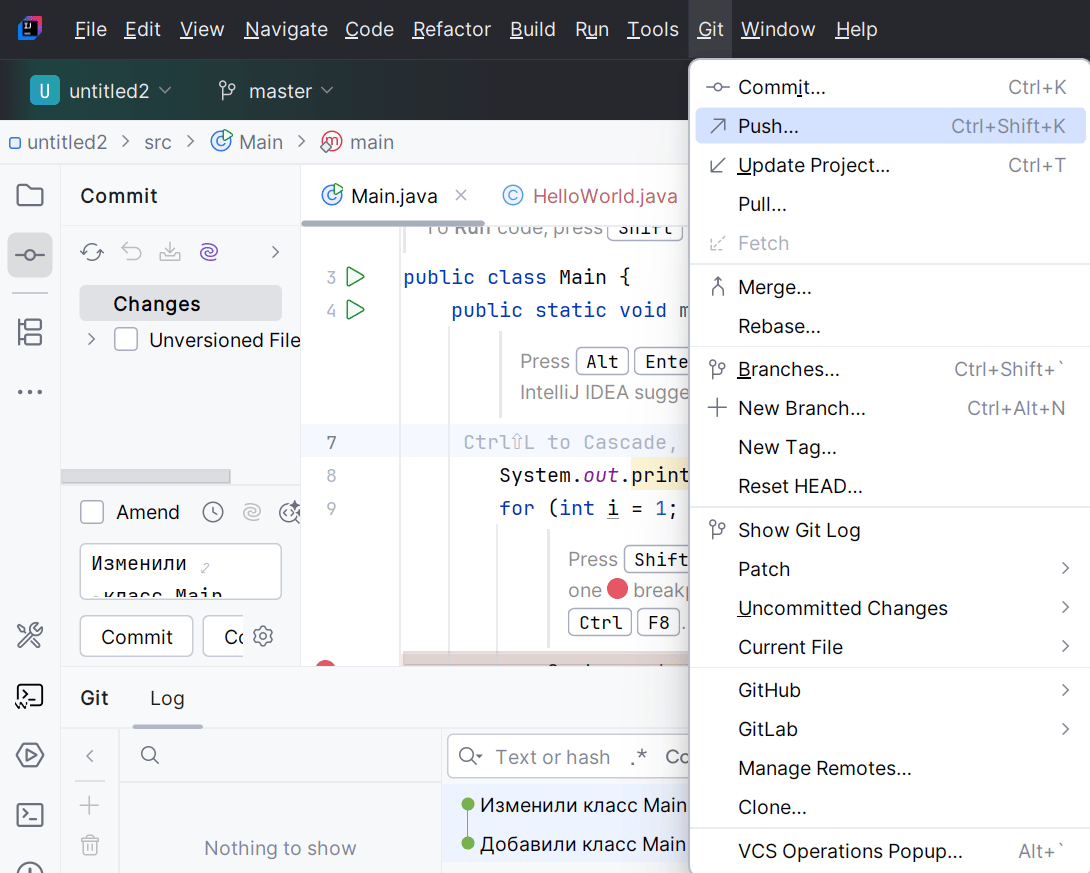
Push sends your local commits to the remote repository on GitHub. Run it from Git → Push… (or Ctrl+Shift+K); in versions before 2020.1 this item was called VCS → Git → Push. The dialog lists the commits that are about to leave your machine:
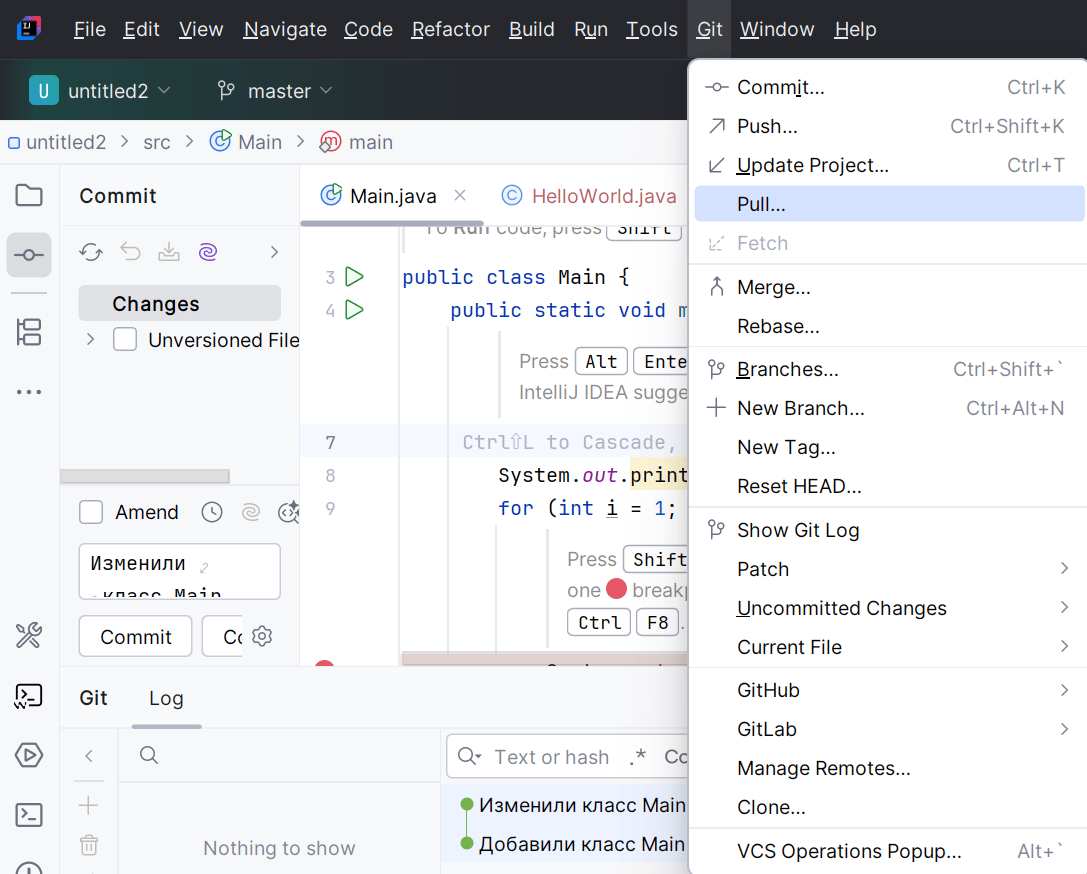
Pull does the opposite: it fetches the commits that exist on GitHub but not in your local repository, and merges them in. You need it when you work from two computers or in a team. Run it from Git → Pull… (in versions before 2020.1 — VCS → Git → Pull):
If the project is already on GitHub and you need to download it instead, see the lesson Cloning a project from GitHub in IntelliJ IDEA.
The same steps in the terminal
The IDE buttons run ordinary Git commands. It pays to know them: in a terminal it is much clearer what actually happened, and on a server without a GUI it is your only option. The full path from an empty folder to GitHub looks like this:
git init                       # create the local repository (.git)
git add Main.java              # put a single file under version control
git add .                      # or everything not excluded by .gitignore
git commit -m "Initial commit" # take a snapshot of the project state
git remote add origin https://github.com/username/my-project.git
git branch -M main             # rename the current branch to main
git push -u origin main        # first push: link the local branch to the remote one
git pull                       # fetch and merge changes from GitHub
The built-in terminal in IntelliJ IDEA opens with Alt+F12 and starts in the project directory, so you can run these commands without leaving the IDE.
Where people usually get tripped up
- Committing the
.ideafolder and*.imlfiles. These are your IDE settings, not project code, and they cause endless conflicts for teammates. Their place is in.gitignore. - Committing
target,out,buildand.classfiles. Compiled output is regenerated from sources in seconds, but it bloats the repository and its history forever. - Assuming a commit reached GitHub. A commit is a local operation. Until you push, the changes exist only on your computer.
- Writing messages like «fix», «123» or «update». A month later such a log tells you nothing. Describe what was done: «Add validation to User form».
- Pushing passwords and keys to a public repository. Tokens, database credentials, an
application.propertieswith real values — scrubbing them from history later is far harder than never committing them.
Frequently asked questions
There is no Import into Version Control item in my IntelliJ IDEA menu. What now?
It was removed in version 2020.1. If the project is not under Git yet, choose VCS → Enable Version Control Integration… and select Git. Once a repository exists, the VCS menu is replaced by a Git menu that holds Commit, Push, Pull and the GitHub submenu. Another option is to run git init in the built-in terminal — the IDE picks the repository up automatically.
Should .idea, target and out go into the repository?
No. A repository holds what the project is built from: sources, resources, pom.xml or build.gradle. The .idea, target and out folders and .class files are generated locally and belong in .gitignore. The one exception is a few files inside .idea, when a team deliberately agrees to share code style or inspection settings.
Why does GitHub reject my password when I push?
GitHub turned off password authentication for Git operations over HTTPS on 13 August 2021. Use a personal access token instead of the password, or sign in through the browser with OAuth: File, Settings, Version Control, GitHub, Log In with GitHub. A token is created on GitHub under Settings, Developer settings, Personal access tokens, and for private repositories it needs the repo scope. The other option is to connect over SSH with a key.
My push was rejected with a non-fast-forward error. How do I fix it?
It means the remote branch contains commits you do not have: someone pushed earlier, or you added a file through the GitHub web interface. Run Git, Pull first (the IDE will offer merge or rebase), resolve conflicts if there are any, then push again. Avoid a force push here - it can wipe out other people's commits.
Comments